Allocation Swapping - CUS 19 or ORD 19
Main Allocation Swapping Screen
Splitting Lines in Allocation Swapping
Allocation Swapping/Advanced Logic for Reallocation of Rolls
Allocation Swapping is the ability to easily switch orders between a status of allocated (assigned to inventory) and unallocated (on back order).
Allocation Swapping includes the following features:
- View all orders for an item, with various sorting options.
- Deallocate an order (inventory is made available and order converted to a back order).
- Allocate an order (similar to filling a back order).
- Exchange allocations (reassign allocated inventory from one order to another. In effect, converting one order from a back order, and the other order to a back order).
- Split lines (which facilitates partially allocating or partially deallocating orders).
Main Allocation Swapping Screen
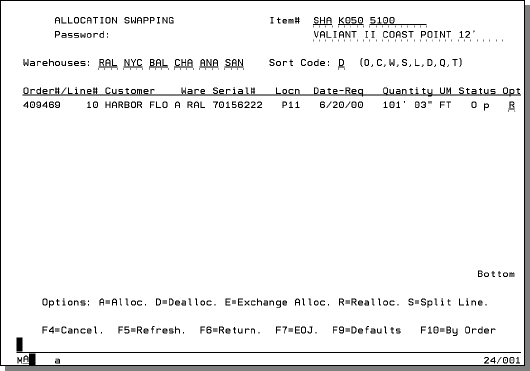
The main Allocation Swapping Screen displays all open orders and holds for the item number appearing on the top of the screen. The orders and holds are limited to the warehouses as controlled by the user's work station Control Panel. The displayed warehouses can be controlled by changing the warehouse fields on the top left of the screen. The sequence of the displayed orders and holds can be controlled by the Sort Code field. This screen allows you to allocate (fill) back orders, deallocate orders and holds, exchange allocations, and split lines by entering A, D, E, or S in the Opt field next to the respective orders.
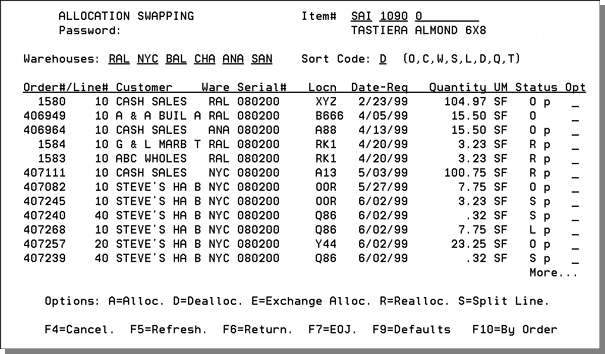
If the Work Station Control Panel (SET 1) being used has not been configured, the system does not know which warehouse data to show so it inserts ALL in the Warehouses field. If you do have a valid workstation AND have the default search warehouse set to *MX (the warehouse matrix), the system looks at the warehouse matrix and pulls up the data in accordance with the matrix file (SET 17) and those Warehouses are listed; as shown above.
|
Field |
Description |
|
Item # |
The item number whose orders and holds are being displayed. This field can be prefilled if you are calling the Allocation Swapping Program from another program such as Order Entry. You can make entries into this field. You can
enter a question mark (?)
to search for items.
|
|
Password |
Enter a password if required. The password controls whether or not the user can update orders. Users can view the Allocation Swapping Screen without a password. |
|
Warehouses |
The warehouses initially displayed are controlled by entries in the Control Panel. If the warehouse matrix is used, all warehouses in the matrix are displayed. If there are more warehouses in the matrix than the six warehouses displayed, then the first six are displayed, but orders and holds for all warehouses in the matrix are still shown. You can override the warehouses, and the screen will only display orders and holds for those warehouses. You can enter ALL as your first warehouse entry, in order to show orders and holds for all warehouses. |
|
Sort Code |
The sort code controls the sequence in which orders and holds are displayed. O = Sort by order number. C = Sort by customer. W= Sort by warehouse. S = Sort by serial number. L = Sort by location. D = Sort by date required. Q = Sort by quantity. T = Sort by status code. |
|
Order # |
The customer order number. For holds, this is actually the reference number. |
|
Line # |
The line number within the order or hold. |
|
Customer |
The customer's name. |
|
Warehouse |
The warehouse from the order detail line. This is the stocking warehouse, or the warehouse a back order was issued against. |
|
Serial# |
The serial number of each line item. |
|
Location |
The bin location of each line item. |
|
Date-Required |
The date material is required to ship or be picked up. |
|
Quantity |
The quantity ordered. |
|
UM |
The UM related to the quantity ordered |
|
Status |
The status of an order or line, followed by a lower case p if that line has appeared on a printed pick list. |
|
Opt |
A = Allocate an order. This option can only be used for a back order. When option A is entered, an Inventory Selection Screen is displayed. D = Deallocate an order. This option can only be used for an allocated order or hold. When option D is entered, the Deallocation Screen is displayed. E = Exchange. S = Split line. When option S is entered, the Split Line Screen is displayed. |
Allocation Swapping Defaults
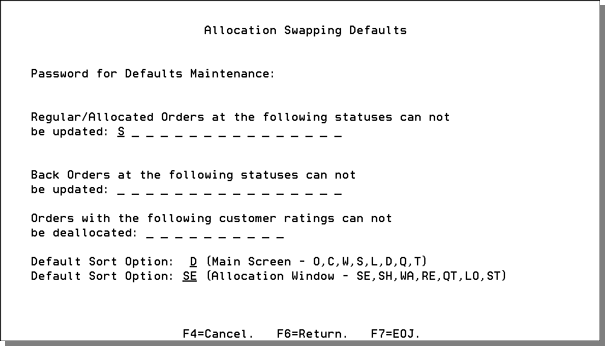
To establish allocation swapping defaults press F9. The Swapping Defaults Screen establishes the default sort options and controls which orders can be updated based on status codes.
|
Field |
Description |
|
Password for Defaults Maintenance |
This is the password required for changing the information on this defaults screen. Do not confuse this password with the password required for using the Allocations Swapping Program. |
|
Regular/Allocated Orders at the following statuses cannot be updated |
Enter the status codes that you want to prevent from being deallocated. The recommended default entries are X,A,S,L,0,1,2,3,4,5,6,7,8 and 9 which represent orders already released for picking. It is very important that these defaults are set, in order to prevent the deallocation of orders that are already being picked or shipped. |
|
Back orders at the following statuses cannot be updated |
Enter the status codes of back orders that you want to prevent from being allocated, if any. |
|
Orders with the following customer ratings can not be deallocated |
This setting allows you to restrict deallocating an order based on the customer's rating code. For example, if a T rating was entered in this field, customers with that rating cannot have their orders deallocated. |
|
Default sort option for main screen |
Enter the sort code to be used as the default on the main Allocation Swapping Screen.
|
|
Default sort option for Allocation window |
Enter the sort code to be used as the default on the Allocation Screen
|
Allocation
The Allocation Screen is displayed by entering an A in the Opt field next to a back order.
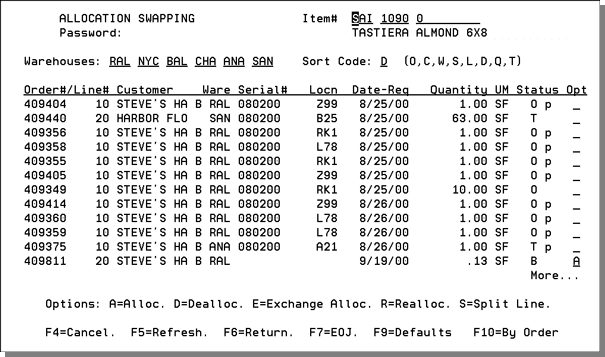
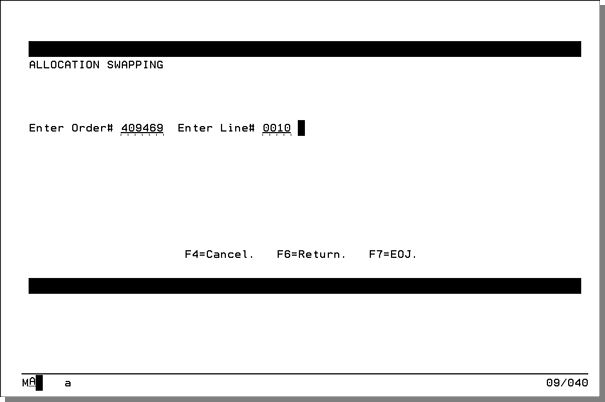
If a user is only authorized to access Allocation Swapping By Order/Line Number, then the screen that appears prompts for an order and line number. When an order and line number is entered, the Allocation Swapping screen appears with information for only that line.
The Allocation Screen, as shown above, displays all of the available inventory for the item being allocated. The name of the customer and item is displayed on the top portion of the screen. The inventory records can be resorted based on the sort code. Available inventory is displayed in the pick UM and the native (pricing) UM. You can allocate inventory by entering X next to your selection. If you need to allocate more than one inventory record, you must first split the back order line. This screen only permits entering X (to allocate) next to an inventory record that can completely fill the ordered quantity. Allocating a back order causes the back order to be filled. All system functions occurring by filling a back order via the receiving system also occur when allocating from the above screen.
|
Field |
Description |
|
Warehouses |
The warehouses, as previously displayed or entered on the previous Allocation Swapping Screen. |
|
Sort Code |
Controls the sequence of the inventory records displayed: SE = By serial number SH = By shade WA = By warehouse RE = By receipt date QT = By quantity available LO = By location ST = By status code of the inventory record |
|
Serial# |
Serial numbers of each inventory record. |
|
Shade |
Shade of each inventory record. |
|
Ware |
The warehouse of each inventory record. |
|
Recvd |
The date each inventory record was received. |
|
Qty - Avail (CT) |
The quantity available of each inventory record, converted to cartons or the pick UM. If the pick UM is the same as the native UM, then the weight per inventory record is shown here. |
|
Qty -Avail (SF) |
The quantity available of each inventory record, in the native UM. |
|
Locn |
The bin location of each inventory record. |
|
Status |
The status code of each inventory record. |
|
Opt |
Enter X next to any single inventory record to allocate that inventory to the back order being updated. If you need to
use more than one inventory record to allocate (fill) the
back order, you must first split the back order line into
lines which can each be filled by a single inventory record.
To jump from the allocation swapping program to an inventory inquiry or inventory adjustment by serial number program, enter an A for the serial number you want to adjust or inquire about. |
When a back order is allocated via the Allocation Screen, the following processes occur:
- The back order is filled. It is assigned to the serial number and bin location selected, and updated to status R. The order line number remains the same.
- The notepad of the order is updated. The notes include information that is generated by the program and the comments entered by the user on the Allocation Screen. These notes cannot be overwritten.
- Back order fill paperwork or bar coded labels are created, just as they would during the back order fill process within the receiving system.
Deallocation
Inventory Adjustments Within Allocation Swapping
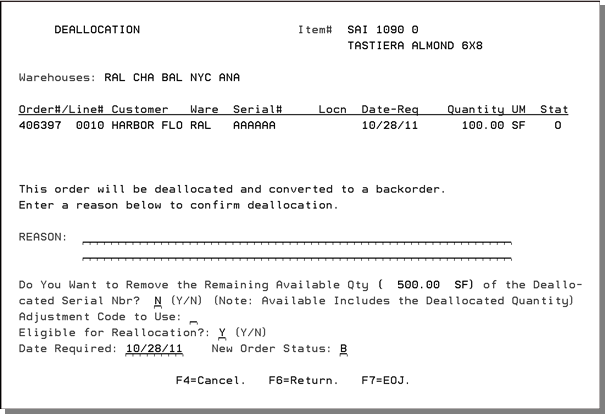
The Deallocation Screen is displayed when a user enters a D in the Opt field next to an allocated order. The Deallocation Screen displays the order selected for deallocation. To deallocate, simply enter the reason for deallocating. You can also change the date required and order status code of the line being deallocated. Deallocating an order converts the order to a back order, and makes the inventory available. The line number of the order is not changed. The same line number is used. The order notepad is stamped with the date, time, and user that deallocated the order. The reason as entered above is also placed into the order notepad.
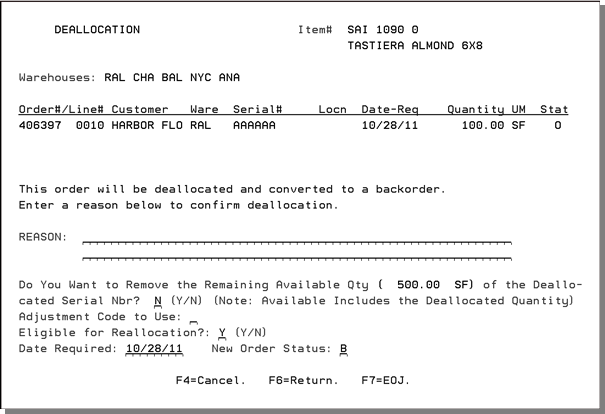
The last two fields on the screen can be used to adjust inventory during allocation swapping. This adds the functionality of an inventory adjustment within the deallocation step of the allocation swapping feature which enables the system to better meet the demands of personnel handling inventory problems in the warehouse during the picking and shipping processes. For example, when a shortage is found during picking, the inventory can be corrected, and the order reallocated to another bin location in a single process, including generation of required labels or paperwork. Inventory accuracy and control have been improved by the consolidation of procedures into fewer steps that provide all of the auditing features on the inventory and order sides of the transaction.
- In the field Do You Want to Remove the Remaining Qty of the Deallocated Serial#?, enter N (the default) to leave the remainder of the item inventory available. Enter a Y to remove all of the inventory of that inventory record from the system.
- Enter an adjustment code for the deallocation in the Adjustment Code to Use field.
Inventory Adjustments Within Allocation Swapping
You can use the Deallocation screen to adjust inventory during allocation swapping. This adds the functionality of an inventory adjustment within the deallocation step of the allocation swapping feature which enables the system to better meet the demands of personnel handling inventory problems in the warehouse during the picking and shipping processes. For example, when a shortage is found during picking, the inventory can be corrected, and the order reallocated to another bin location in a single process, including generation of required labels or paperwork. Inventory accuracy and control have been improved by the consolidation of procedures into fewer steps that provide all of the auditing features on the inventory and order sides of the transaction.
To set up and adjust inventory from Allocation Swapping
Before using this feature, access the CTRLUSER (SET 2) program and enter the parameters that control allocation swapping.
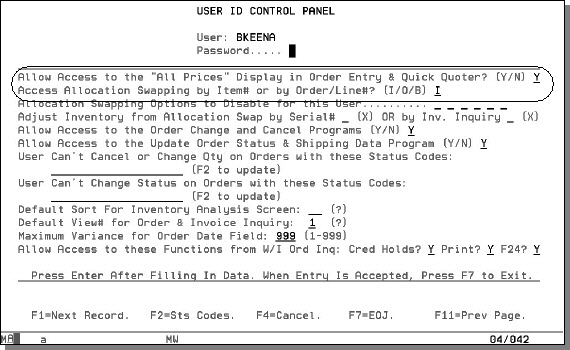
Use the three allocation swapping parameters shown above to establish safe and secure means for various types of users to perform tasks within the allocation swapping program.
For warehouse personnel, particularly second shift workers, who may not have office support while they are picking goods, we recommend the following settings:
- In the Access Allocation Swapping by Item# or by Order/Line#? field, enter O. This limits warehouse personnel to adjusting one order at a time.
- For Allocation Swapping Options to Disable for this User, disable all options except option R (disable A, D, S, etc.). This allows warehouse personnel to reallocate when goods are unexpectedly missing from an allocated location, yet prevents warehouse personnel from using the other capabilities of allocation swapping.
- In the Adjust Inventory From Allocation Swap by Serial# or by Inventory Inquiry field, enter X beside your choice. This causes either the Adjustment by Serial# program or the Adjustments from within Inventory Inquiry program to be used when this user chooses to adjust inventory while in the allocation swapping program. If you do not enter X next to either of the options, then the user cannot adjust inventory from within the allocation swapping program.
Adjusting Inventory for Allocation Swapping
- In the Deallocation screen, in the field Do You Want to Remove the Remaining Qty of the Deallocated Serial#?, enter N (the default) to leave the remainder of the item inventory available. Enter a Y to remove all of the inventory of that inventory record from the system.
- Enter an adjustment code for the deallocation in the Adjustment Code to Use field.
- Press F6 to return to the Allocation Swapping screen to try another option, if applicable.
- Enter an R in the Opt field next to order/line to re-allocate, and press Enter. The adjustment selection box appears.
- Select the new inventory to re-allocate the order/line to.
- The Do You Want to Remove the Remaining Qty of the Deallocated Ser#? and Adjustment Code to Use fields operate the same as for deallocation.
- The optional field New Status Code for Inventory That Was Deallocated can be used to assign a code to inventory that is being removed from the system. For example, if you want to leave the deallocated inventory on the system, you can give it a status code, such as L, for lost.
- Make any needed adjustments. Press F7 to return to the Allocation Swapping program.
The adjustment codes are assigned and maintained through option 5 - System Cross Reference Table File of the System Settings Menu.
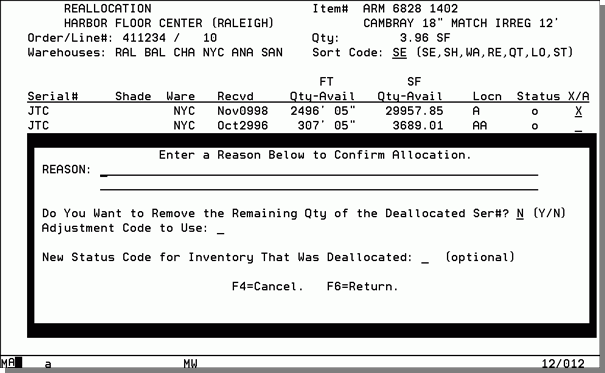
You can select inventory by placing an X in the X/A field, but you can also adjust inventory using the new A code. Your CTRLUSER setting determines if you can adjust inventory from this screen, and if so, which inventory adjustment.
To access a listing of all of the status codes enter a ? in the field and press Enter.
Allocation Exchange
The following is an example of an allocation exchange. The E (exchange) option allows you to fill one or more back orders with the inventory deallocated from another order. In this example, order 409819 is a back order that will be filled with the inventory deallocated from order 409686.
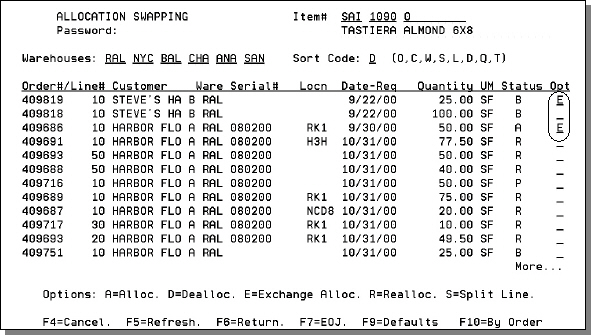
When requesting an exchange, observe the following guidelines:
- An exchange must include at least one back order.
- An exchange must include only one allocated order.
- The inventory from the allocated order must be enough to fill all of the back orders.
- Enter option E next to all of the orders in the exchange.
The following screen shows the results of the exchange.
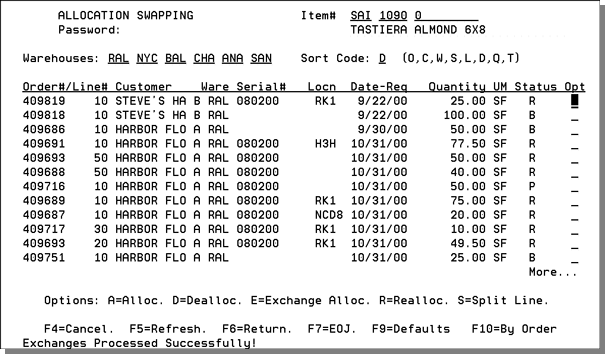
The orders that were back orders are now at status R, indicating they have been filled. The order that was deallocated is now at status B. The note pads of all orders involved in the exchange are updated.
The Exchange function automatically creates notes, in each of the orders that are affected by the exchange.
Reallocation
The R option for reallocation is meant to combine a deallocate and an allocate in one step. A reallocation is done when you simply want to change the assigned serial number or bin location of an order/line. Reallocation can be safely used by warehouse personnel.
Using Reallocation in the Warehouse
You can use the reallocation feature in the warehouse without allowing access to other functions of Allocation swapping. Follow these steps:
- Limit warehouse personnel to Order/Line access to Allocation Swapping. This restriction is made in the CTRLUSER Program.
- Restrict warehouse personnel from all Allocation Swapping options except R for reallocation. This restriction is made in the CTRLUSER Program.
- Warehouse personnel can then reallocate when goods are not found in the expected locations or are damaged.
Splitting Lines in Allocation Swapping
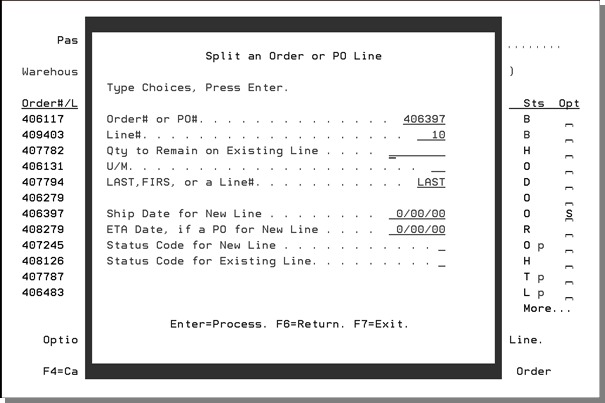
The S (split line) option allows you to split an order line into two order lines that represent the same total quantity. Used in conjunction with the A (allocation), D (deallocation) and E (exchange) option, you can process partial allocations and partial deallocations.
The following screen appears when the S (split line) option is entered.
|
Field |
Description |
|
Required Entries |
|
|
Quantity to remain on existing line. |
Enter the quantity remaining on this line number, after the line is split. The difference is put on the new line created when the line is split. |
|
Unit of measure |
Select the UM related to the quantity stated above. |
|
Place new line |
Controls the line# of the new line.
|
|
Optional Entries |
|
|
Ship Date for new line |
Optionally enter a ship date for the new line. Leave this field blank for the ship date on the new line to remain the same as the existing line. |
|
ETA Date for new line (PO only) |
Leave this field blank for customer orders. |
|
Status for new line |
Optionally enter a status code for the new line. Leave this field blank for the status code on the new line to remain the same as the existing line. |
|
Status for existing line. |
Status codes allow you to identify the status of each line of each order as it moves throughout the system and your warehouses. |
To Use the Split Line for Partial Deallocation
- Use the S option to split a line
- Split the quantity to deallocate to a new line.
- Find the line created in step 1 and use the D option to deallocate it.
To Use the Split Line Option for Partial Allocations
- Use option S to split line.
- Split quantity to allocate to a new line.
- Find the line created in step 1 and use the A option to allocate it.
Allocation Swapping/Advanced Logic for Reallocation of Rolls
Example of Reallocation of Roll Balance
This advanced logic provides a more flexible approach for roll swapping, saving significant time and avoiding potential errors such as incorrect selection of inventory.
The advanced logic for reallocation of rolls allows the selection of any other roll as long as it meets the criteria for an acceptable roll size. Acceptable roll sizes are defined differently for full roll orders and roll balance orders.
- A full roll order is an order for a roll that is equal to the originally received size of the roll.
- A roll balance order is an order for a roll that is less than the originally received size of the roll.
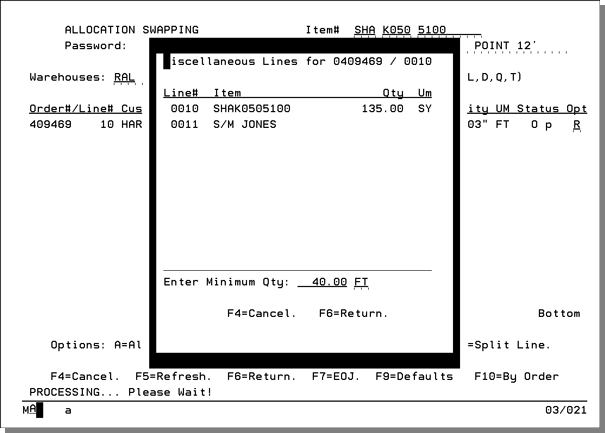
Acceptable roll size for full roll orders is defined by the min./max allowable roll size for that customer, chain or generic account number. You will specify the acceptable roll size for roll balance orders. In both full roll orders and roll balance orders, you are presented with a pop-up window for viewing the order messages (miscellaneous F6 lines) associated with the line being re-allocated. This feature enables you to see if there is a minimum quantity or must match message. In full roll order situations, the window shows the minimum quantity found in the Customer Preferences File. In roll balance order situations, the window allows you to specify the minimum acceptable roll size.
- The screen below displays the minimum and maximum roll sizes that are defined in the Customer Preferences File.
- Press Enter to display the allocation swapping screen for order 409469, line 10. The reallocation (R) option is entered to reallocate roll number 7016222 for another roll.
- The screen below demonstrates the screen that displays for all roll or roll balance allocation. This screen displays the line being reallocated, and any miscellaneous comments for that line.
- Along with displaying the miscellaneous comments on the screen, the screen also displays the minimum quantity from the customer preferences file minimum/maximum settings.If a minimum is not found in the preferences file, the system defaults the minimum quantity amount as the quantity on the original order.
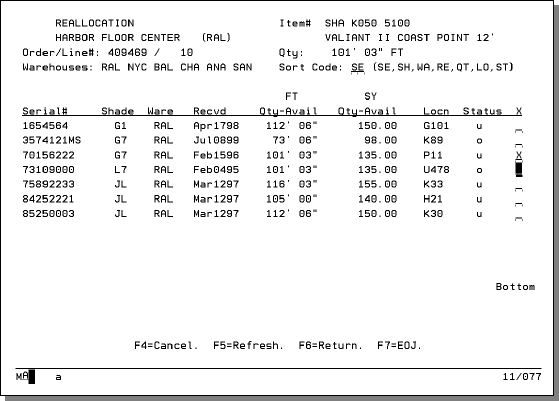
- The next screen is the process displays all available inventory for item SHA K050 5100, with availability greater than the 40 ft. minimum quantity entered as the minimum quantity.
- After selecting a new roll, you must enter the reason for the reallocation. This gives you the ability to track why the reallocation was made.
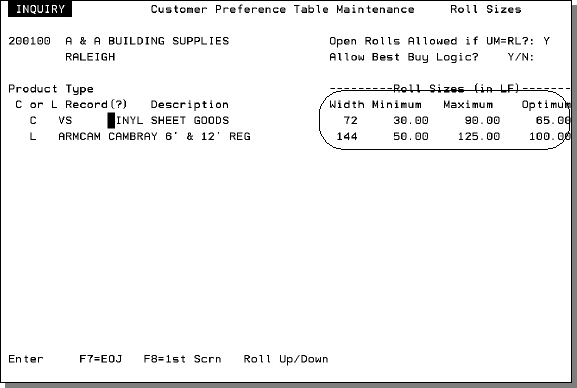
When reallocating a roll, the system evaluates the minimum and maximum fields to define what quantities should display. Also, the system evaluates the Open Rolls Allowed if UM=RL field in the Customer Preferences File to identify if open rolls that fall into the specified minimum or maximum quantities should display.
The screen below displays the allocation swapping program accessed by order and line number.
Example of Reallocation of Roll Balance
The screen below displays order 409470, line 10. This order is a roll balance order.
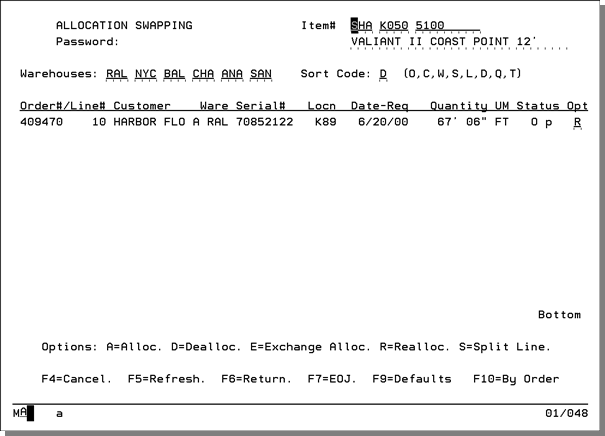
With a roll balance, the above screen displays similar to a full roll order, except you have the ability to override the default minimum qty on the screen.
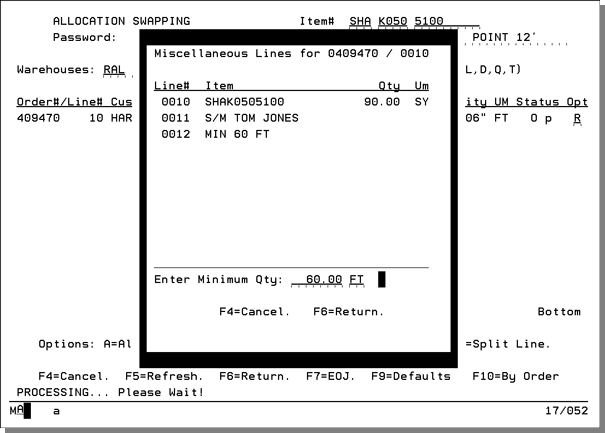
In the previous screen, the minimum qty of 40 ft. was pulled from the preferences file. As displayed on the above screen, the customer has requested a minimum of 60 ft., as entered on miscellaneous line 0012. Therefore, the minimum qty was overridden to 60 ft.
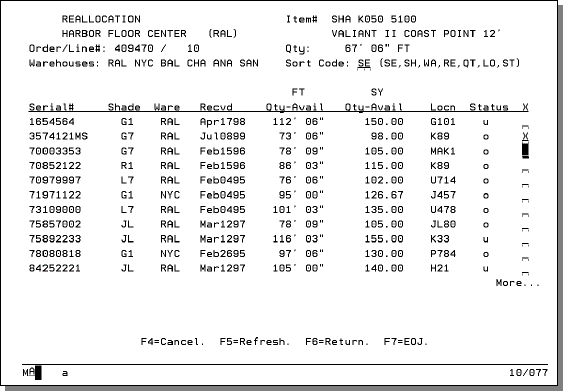
The above screen displays the inventory for SHA K050 5100, with an availability greater than 60 ft. as specified on the previous screen.
Associated Files
- Options for Allocation Swapping
- Fix Inventory Allocations - SYS 117
- List/Update S/N Allocation Errors & Holds Not Removed (IVAUD4,IV) - SYS 312
- Purge Unprocessed Pending lines with no allocations by Date (back order) - SYS 925
- Flexible Allocation in IWMS
-
Master User ID Control Panel - SET 32 - The settings Access Allocation Swapping by Item#, by Order/Line# or by Both and Allocation Swapping Options to Disable for this User.
